How To Start A Mommy Blog

Congratulations! You want to start blogging, but how to you get started? There are so many options and choices to be made, it can be overwhelming. But I’ve put together a quick guide to show you how to start a mommy blog. Here we go!
One of the questions I get from mommies new to the blogging community is “How do I get started?” or “I have mine set up, but no one but my family reads it”. And we’ve all been there! But with a few decisions, you can not only get your new blog online, but you can build an audience of readers beyond just your family circle.
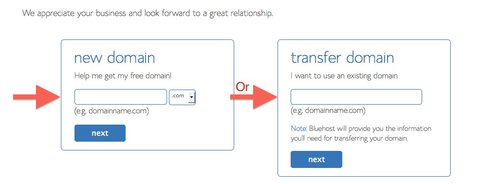
1. Decide the name of your blog – This can be the easiest or most difficult step of the whole process. My suggestion would be to consider what you’re going to write about. Maybe you want to write about your daily life, so using a play on your name would be perfect. Maybe you’re the only female in a house full of men, you could come up with a twist on that. In the end, pick something that you like, but it also has to be available (i.e. no one else is using it). Then, head to Bluehost to get started! It should look something like this:

Note: This is where you can type the name of the domain (name) of the blog you want to start. Bluehost will tell you if it’s not available, or proceed to the next step if it is! And don’t worry, if it’s already taken, come up with another name or a variation of it.
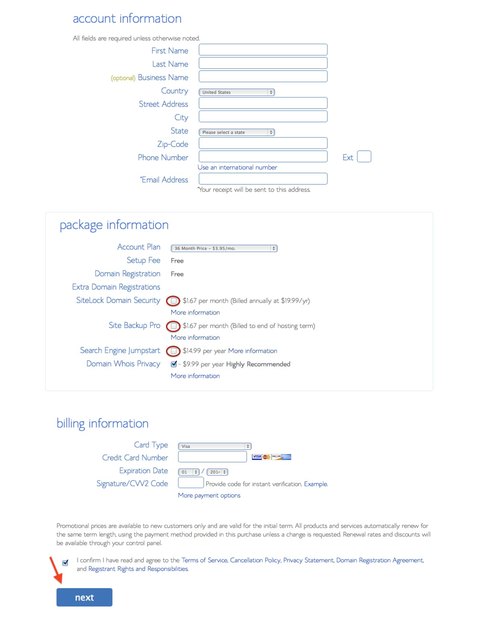
2. Decide what package and services you want – So using Bluehost makes this really simple. You enter your information, select the packages and/or services you want to purchase, and you’re almost ready to start writing! Here’s what it should look like:

3. Activate your new domain/blog name with WordPress – If Bluehost is the “host” for your mommy blog, then WordPress is the “publisher”. It is where you will log in to design your blog, upload pictures, and most importantly, where you will write your entries! With only a few steps, you can be all set to share your life with the world.

4. Log into WordPress – In the last step, you will have set up a username and password, which is what you’ll use to get logged in. Tada! Now the fun begins.
5. Design your blog – WordPress has a bunch of themes/designs to choose from. Some are free, some are paid, and there are more options all over the net. I’d recommend finding a basic one to get you started, because you can always change it later. And believe me, there are a ton of options to look at. But you should be able to get the first one installed and be ready to publish in about 5-10 minutes.
6. Publish! – Now you can write your first post! WordPress is set up similar to a word processor with their icons and features. Pick a title for the post, then start typing! You can then add pictures, change fonts, link to other bloggers, etc etc.
This is obviously a quick overview for beginners who want to get a foot in the door, but maybe not sure how to get started. There are a bunch of options for themes, topics, tools and other software but you’ll have plenty of time to wade through all of that. For now, start writing about your passion, your family, your farm or even just your kids! It won’t take long to get established in the online communities and you’ll be well on your way into the mommy blogging world!
Disclosure of Material Connection: This is a sponsored post. The company who sponsored it compensated me in some form of payment. Regardless, I only recommend products or services I use personally and believe will be good for my readers. I am disclosing this in accordance with the Federal Trade Commission’s 16 CFR, Part 255: “Guides Concerning the Use of Endorsements and Testimonials in Advertising.”
I’ve been blogging awhile, I just haven’t gone public yet. I use wordpress, but I don’t think I used Bluehost. What’s the reason for Bluehost? Is it affiliated with google somehow?